How To Control Fan Speed On PC?
Are you tired of your PC’s noisy fan or concerned about its temperature skyrocketing during intense gaming sessions? Look no further! In this guide, we’ll walk you through the simple steps to control fan speed on your PC.
Say goodbye to excessive noise and overheating issues with these easy-to-follow instructions.
Understanding Fan Speed Control
When it comes to keeping your PC running smoothly, understanding fan speed control is crucial. Let’s dive into the different cooling methods used in PCs and why controlling fan speed is essential for optimal performance.
Different Cooling Methods in PCs
In a typical PC setup, two main cooling methods are commonly employed: air cooling and liquid cooling.
Air cooling involves using fans to circulate cool air around the components, while liquid cooling utilizes water or other fluids to dissipate heat more efficiently.
The Importance of Controlling Fan Speed
Controlling fan speed isn’t just about reducing noise; it plays a vital role in maintaining optimum temperature levels and overall system health.
When the internal temperature rises due to heavy usage or overclocking, high-speed fans can help dissipate excess heat effectively.
However, constantly running fans at high speeds can generate excessive noise that may become bothersome during regular use.
That’s where controlling fan speed becomes valuable – by adjusting the fan speeds according to workload demands, you strike a balance between efficient cooling and minimizing noise pollution.
Impact of High and Low Fan Speeds
The impact of fan speeds on temperature is straightforward: higher speeds lead to better heat dissipation, resulting in lower component temperatures.
On the flip side, lower fan speeds might not provide adequate airflow for effective cooling, potentially causing overheating issues.
Moreover, high-speed fans tend to produce more noise than slower ones.
By lowering the RPM (rotations per minute) of your fans when they’re not under heavy load or during idle periods, you can significantly reduce unwanted noise without compromising performance.
Additionally, consistent exposure to high temperatures can affect your hardware’s lifespan negatively.
Properly controlling fan speed ensures that your components stay within safe operating temperatures for extended longevity and reliable performance.
Manual Fan Speed Control
When it comes to taking control of your PC’s fan speed, you have a couple of options at your disposal.
Overview of BIOS Settings
The Basic Input/Output System (BIOS) is the firmware that initializes hardware components during startup. It also provides access to various settings, including fan controls.
To access the BIOS setup utility, restart your computer and look for an on-screen prompt or a specific key to press (commonly Del or F2) during boot-up.
Locating Fan Control Options within BIOS
Once you’re inside the BIOS setup utility, navigate through different menus using arrow keys until you find an option related to fan control.
The exact location may vary depending on your motherboard manufacturer and model. Look for labels like “Hardware Monitor,” “Fan Configuration,” or similar terms.
Within these settings, you can typically adjust parameters such as target temperatures or define custom fan curves based on temperature thresholds.
These configurations allow fans to spin faster as temperatures rise and slower when they cool down.
Third-Party Software Solutions
If accessing the BIOS seems daunting or if your motherboard lacks advanced fan control options, there are third-party software tools available that simplify manual fan speed management.
Popular applications like SpeedFan and MSI Afterburner provide comprehensive controls over fans’ RPMs directly from within Windows. To get started with these programs:
- Download the desired software from their official websites.
- Install them by following simple on-screen instructions.
- Launch the program and locate the relevant fan control options in its interface.
- Configure individual fans according to personal preference by adjusting sliders or creating custom profiles based on temperature readings.
These user-friendly software solutions offer flexibility in managing multiple fans simultaneously without requiring extensive technical knowledge about motherboard-specific features.
Automatic Fan Speed Control
Controlling fan speed manually can be effective, but what if you prefer a more hands-off approach? This is where automatic fan speed control comes into play.
Motherboard-Based Controls
Modern motherboards often come equipped with built-in automatic fan control features. These intelligent systems monitor the temperature of various components and adjust fan speeds accordingly to maintain optimal operating conditions.
To access these settings, you need to enter your motherboard’s BIOS setup utility by restarting your computer and pressing the designated key (usually Del or F2) during boot-up. Once inside the BIOS, look for options like “Hardware Monitor” or “Fan Configuration.”
Here, you can enable automatic control modes such as “Smart Fan,” which uses temperature sensors to regulate fans’ RPMs automatically.
Software-Based Controls
In addition to motherboard-based controls, there are Windows-based applications available that provide automated fan speed regulation.
Programs like HWiNFO or ASUS AI Suite offer advanced monitoring and control functionalities for various hardware components including fans.
These software solutions allow you to set up custom profiles based on temperature thresholds.
By defining target temperatures and corresponding fan curves within the application’s interface, fans will adjust their speeds dynamically based on real-time readings from temperature sensors in your system.
GPU-Specific Controls
Graphics processing units (GPUs) also have their own mechanisms for automatic fan speed control. For example:
- NVIDIA’s Adaptive Vertical Sync (AVS) adjusts refresh rates dynamically based on GPU workload demands while controlling associated cooling performance.
- AMD’s Radeon Chill feature optimizes power consumption by dynamically managing frame rates during gameplay sessions while adjusting cooling performance accordingly.
These GPU-specific technologies ensure efficient cooling without compromising gaming experiences or increasing noise levels excessively.
Advanced Cooling Solutions
When it comes to achieving optimal cooling performance for your PC, advanced cooling solutions go beyond traditional methods.
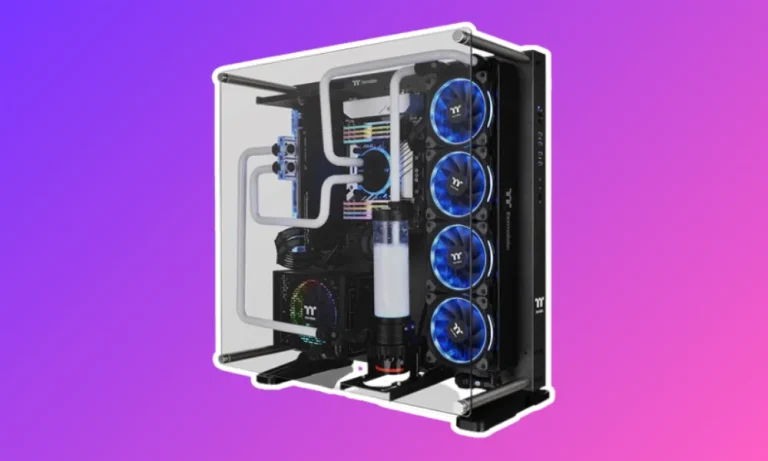
Liquid Cooling Systems
Liquid cooling technology offers several advantages over air cooling systems. By using water or other fluids as a heat transfer medium, liquid cooling can dissipate heat more efficiently than air alone.
In a liquid cooling setup, key components include:
- Water blocks: These are specialized units that make direct contact with the CPU or GPU to absorb heat.
- Pumps: Responsible for circulating the coolant through the system, ensuring effective heat dissipation.
- Radiators: Equipped with fins and tubes that facilitate efficient transfer of heat from the coolant to the surrounding air.
- Tubing: Connects various components together while allowing fluid flow within the system.
The use of liquid allows for better temperature control and lower noise levels compared to traditional air coolers. It is especially beneficial in high-performance systems where overclocking generates significant amounts of heat.
CPU Coolers with Built-In Fans/Controllers
All-in-one (AIO) coolers like Corsair Hydro Series or NZXT Kraken offer an alternative solution to custom-built liquid cooling setups.
These AIO coolers come pre-assembled and typically consist of a radiator, pump unit, tubing, and integrated fans/controllers.
These compact yet powerful CPU coolers provide excellent thermal management without requiring extensive installation procedures.
Integrated controllers/fan curves allow users to adjust fan speeds based on temperature readings automatically or manually fine-tune them according to their preferences.
Not only do these AIO coolers enhance overall performance by effectively removing excess heat from CPUs but they also add aesthetic appeal due to their sleek designs often accompanied by RGB lighting options.
FAQs
1: Can I control the fan speed on my PC without any additional software?
No, controlling fan speed on a PC typically requires either accessing the BIOS settings or using third-party software tools.
2: How do I access the BIOS setup utility to control fan speeds?
To access the BIOS setup utility, restart your computer and look for an on-screen prompt or press a specific key (commonly Del or F2) during boot-up. This will take you into the BIOS where you can adjust fan control settings.
3: Is it possible to control fan speeds in Windows without accessing the BIOS?
Yes, there are third-party software solutions available that allow you to control fan speeds from within Windows. Popular options include SpeedFan and MSI Afterburner, which provide comprehensive controls over fans’ RPMs directly from their user-friendly interfaces.
4: What is PWM and how does it relate to controlling fan speed?
PWM stands for Pulse Width Modulation. It is a method used by modern motherboards and fans to regulate fan speeds.
5: Can I use liquid cooling systems as an alternative way to control fan speed?
Yes, liquid cooling systems offer advanced temperature management by utilizing water or other fluids as heat transfer mediums. These systems often come with built-in pumps and radiator setups that allow for more efficient heat dissipation compared to traditional air cooling methods.
Conclusion
Controlling fan speed on your PC is essential for maintaining optimal temperature levels and system performance.
Whether through BIOS settings or third-party software solutions, taking control of fan speeds allows you to strike a balance between efficient cooling and minimizing noise.
So don’t let your PC’s fans run wild – take charge and keep things cool!